Friday, June 3, 2011

Shirt construction

A few years back I spent a summer working as a hostess in a restaurant (my only food related job... they had the best dinner rolls). Well the dress code required us to buy these utility-like dress shirts with the collars starched like crazy (we had to get them dry-cleaned). Well after I left the job I had two of these shirts and haven't worn them since.


A while ago I had bought elastic thread to go into the sewing machine. You wrap it kind of tightly around a bobbin and just sew with it as you normally would. So I sewed in about 5 strips across the entire shirt and two more in the back. I found that you have to check that the thread catches the bobbin each time you start to sew with the elastic since at least ever two times it seemed to miss it.
My lines weren't completely straight but good enough for a nighttime project.

After this I added the trim. Walmart had a bunch of ribbon and balls of "lace" for $1. This lace was a bit wide but repeated the same pattern on each side so I folded it in half and sewed it down the middle to get a double effect to one side. Then I sewed this with the ribbon on top down each side of the buttons.

Next I decided to cut off the collar to give it a more Victorian look.


I also sliced off the arms as well. I saved the cuffs separately.


Next I put darts in the arm holes to close them up a bit and added the ribbon around them. After wearing the shirt with the cuffs for a day I realized I wanted to add ribbon trim to the cuffs as well.  

tons of tulle!

This past weekend was Memorial day weekend, and any holiday with a name means a sale at Joann Fabrics (one of two places to buy fabric in the area). So Joann had tulle for sale making it $.89 per yard. So I bought 10 yards of white tulle. After washing it (swishing it around in soapy water then clean water) I hung it outside for a while. I hung it up at night for two reasons, 1: I was up and 2: I figure the fabric is delicate and In direct sunlight it may get damaged so I didn't want it hanging at noon.
So once this was clean as well as some white fabric I picked up on sale, I decided to make a petticoat.
Since most of the skirts I would be using will be circle skirts and this shouldn't show underneath I decided to go for a gourd pattern for the skirt. I also plan on adding elastic to the waistband so I made it larger then necessary.
Since the fabric was about 44in in width I folded it in half to have about a 20in long petticoat and measured in 13 in for the waist then drew diagonally down to 17 in and repeated for 4 gourds. I then sewed these together on all but one side since it would be easier to attach the tulle while it was flat and not in a circle.  I also sewed in a loop at the top for the waistband.
I found that in order to deal with tulle especially when you want to gather it it is best to have lots of open space. I cut 140in of tulle off from my 10 yards and laid it out in my hallway so I could cut it in half width wise. This gave be two strips about 29 in wide.

Next I folded each strip in half to make the width about 14in and used my serger to gather it together.
I set the serger so the differential foot was at 2 and the stitch length was 4. I also lowered the stitch width to about 6mm. In doing this I found that these settings cause the serger to gather the materiel so we get about 1/6 of the original length. So I loosened the gathers a bit and stitched it upside-down to the right side of the skirt using my sewing machine at about 10in from the waistband.

After loosening the gathers a bit I ended up using about one and a half of the tulle I had prepared.  I then repeated the process with the tulle  using another 75in to compete the skirt. I sewed a second layer about 5in from the waistband.


I decided to thread some string through the waist to see how it looked although after another trip to the store I will get some more elastic so I can finish the petticoat.
I think the next one will be made out of fabric and I may need about 4-6 yards of 45in wide fabric to make it! (actually my initial calculations said 17 yards but that isn't happening. )

Wednesday, June 1, 2011

the bridesmaid dress journey

My wonderful friend Eden will be getting married this June and had asked me to be one of her brides maids! I'm so excited for her and can't wait for the wedding. However there are a few things that need to be done first. I've never been a bridesmaid before, although this probably isn't going to be the typical 'American' bridesmaid experience like we see on tv. The first difference is all the bridesmaids aren't wearing the same dress. Eden sent us a cord of color and said to get a long dress as close to this color as possible. So of course I decide making my dress would be the better option.

The first thing I did was look around for a pattern that I would like. And I came across this simplicity pattern 2442. I really liked the neckline and I figured I could just make a few adjustments elsewhere. Since I am horrible about adjusting a pattern to fit me while it is still in pattern state I decided the best course of action would be to make the dress out of fabric I had lying around first, then adjust the pattern and then finally make it out of the blue fabric for the wedding.


The pattern is a tad complicated where the majority of the time is spent in constructing the bodice of the dress. It has a complete lining and there are about 3 layers of fabric on the waist. I made a few minor changes to the pattern initially such as adding ties to the waist to create a belt and getting rid of the ruching around the back of the dress.


The hardest alteration I will need to do is in the bust area. I was reading online that the majority of patterns are built with a B sized bra cup in mind and unfortunately I am not a B cup so anything fitted around the bust will need to be enlarged quite a bit. I have yet to discover exactly how to do this without changing other dimensions such as the length in the arm hole and length of the waist. What I'm thinking now is cutting along the points of the pleats in the pattern and just lengthening there so the darts end up larger.


For the most part I do like the finished product Although I may make the skirt a bit wider just to make the entire thing a bit more summery as well as lower the neckline in the back(this will also make it easier to dress myself since it took me about 3 minutes to zip the dress the first time and about 10 min to unzip it.

ummmm brella

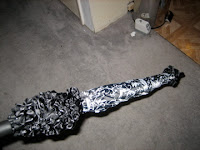
One popular accessory is a parasol. I bought two umbrellas from walmart. One I took the fabric off of to make a pattern to make more parasols the other I decided to leave almost as is since it had a pretty black and white pattern (this one was only $5).

I altered it by cutting out a small section from each 8th of the umbrella so it curves inwards from the points. Next I bought a 30ft roll of black ribbon from walmart for $4 and ran it through my sewing machine with a long stitch. My initial thought was to use the thread to gather the ribbon but since one side was slippery and shiny and the other was matte with a bit more friction The ribbon gathered itself while i was sewing!
My next step was to pin it to the edge of the umbrella. I then tried to place the entire umbrella on my sewing machine to sew on the new trim however the spokes made it extremely difficult and I wasn't able to properly attach the ribbon. So I moved on to hand sewing and stitched the ribbon to the umbrella all the way around.

Next I stitched some ribbon around the top bit to match the bottom. Although there are two rows of ribbon at the top.