Monday, April 23, 2012

Backlog of crafts!! (Part I)

Once upon a time, there was a graduate student who knew she had work to do. Papers to grade, tests to study for, research to do! She could barely see how to keep her head above water. So what happened to this poor overstressed soul? She procrastinated.  How you ask?
She finished the Abby Caddaby outfit for her 'niece' lily's second birthday
She decided to dip her toe into the world of sweet lolita and made several skirts
Worked on Cutsew tops
Made a Parasol in design, not function
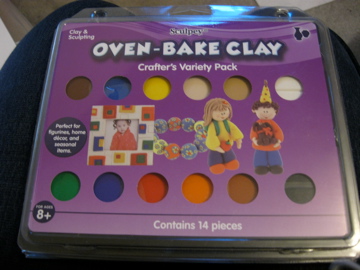
Made clay jewelry
Flower hair clips
and more.
Unfortunately she didn't blog about any of this until now!

Since the most recent projects are fresh I'll be blogging backwards.

After one night up way too late on the internet I decided to create an Etsy account and order several (30) ring blanks to make rings the blanks cost about $12 shipped. After doing this I also decided to get on ebay  and found earring posts (24 pairs) with backs and hair clips (20) for about $15. These arrived first.

Using the clay I had bought (see earlier post) I decided to make some of the cute earrings I had seen on the internet. Most of the ones I found entertaining were the items from Mario. So far I have made toadstool earrings and Yoshi egg earrings. I also will attempt to make chomp earrings and the evil fire plant earrings after a bit of study on how to do it. For the teeth I realized recently that i should just roll a tube the approximate height i want then make it into a triangular prism shape then cut them to make the teeth. (Pictures to come) I used to love Yoshi (favorite character) so I plan on making more yoshi inspired earrings as well. And possibly Kirby.
The main reason to get so many posts (and now I'm beginning to thing 24 isn't enough) was to make sweet jewelry to match my outfits. I've made a pair of strawberry earrings as well as purple and white spiral lollypop earrings. I will need to obtain a chain to hold the red and white spiral pop that I had made as a necklace (hopefully for less than $2).

As for the flower hair clips I'm slowly getting the hang of it, although I'm beginning to realize I need better quality flowers than the ones from the dollar store since most aren't full enough. I'm thinking about making my own but that would be a whole other project. So far I've just been playing with the hot glue gun. 

I've been wanting a parasol for quite a while now. I had attached ribbon to an umbrella and it is cute and I still love it but I wanted something with more fluff to it. Since at the time I was determined to start a new project without leaving my house to buy something I found a stash of old black yarn and found a fun doily pattern on the internet, figuring that I could just adapt it for the larger parasol, and by adapt I mean just ignore the gauge size and see what happened. With (LOTS of) help of my friend Michelle I was able to finish the pattern. Which took several weeks (mainly of me waiting to ask for help again) Then I bought an umbrella from Walmart for $5 and cut off the covering. With a $1 can of spray paint I painted the silver spokes black since the pattern is very reminiscent of a spider web I didn't want it to have  the obvious silver spokes. After painting it and letting it dry for a day or so, I sewed the crochet pattern to the spokes and it was done. However after looking at how large it was I decided to see if I could get it to shape more into a bell, So I crochet a chain around to narrow the circumference.  Although I still had it a bit too wide this made much of a difference giving me an idea for a much more useful parasol.
I plan on taking the fabric cut from the umbrella and cutting it into the right shape to have the desired circumference of about 90in or so then cut fabric to match it. After decorating the fabric I can sew it to  a new umbrella. I'm planning on this new project costing me under $10 by using quite a bit of odds and ends I already have around.
Now that it's 2am and I have a test in less than 10 hours I must say adieu, buenes noches, 休みなさい!

Saturday, March 10, 2012

The new sesame street?

Apparently Sesame street has a new look and characters that I don't know. I found this out sitting on my friend's couch while her daughter was watching this strange updated sesame street.
Fastfoward several months later and I get a message from that same friend telling me that she want's to do an Abby Cadabby theme birthday party for her daughter's 2nd birthday. My first question "Who in the world is Abby Cadabby?" Well apparently the new layout is the only new aspect of sesame street. There is a new character named Abby Cadabby! After a bit of research I find out that she is a 3 year old fairy in training!
Well why has my friend messaged me with this news? She was hoping I could help her out by making an Abby outfit for her daughter. OF COURSE  I would!!!
Now this has opened a whole new challenge for me, how am I going to make an outfit for a 2 year old who lives over 1,000 miles away!

I'm 'always' up for a fabric related challenge. So I gathered several measurements from my friend and she also gave me her daughter's clothing size, 2T.  Since I was working without a pattern I decided to run do the second hand store and pick up a dress in her size to model my design after. Apparently you can find adult clothes cheaper than some children's close at the 2nd hand store, lucky for me the dress I picked up was only $3.

Next I picked up fabric. I found some chiffon type fabric in the remnant bin for about $5 and some mirrored organza for another $5. I also picked up flower petals from Joann's (the only place that had them in the area) and was able to use a 40% off coupon to get them for about $7.

In order to get the desired matching color scheme I decided the best bet would be to dye everything, blue, blueish purple and purple. I also saw the perfect color thread on sale for 50% off and got both blue and purple to use in the serger. I used a strange soaking method for the dying since I wanted to get a light color. I also decided to go for the three different shades.

I dyed the flower petals by threading them all through a strings and then splitting them into three different bunches.

After this I had to take a break since school called.

Monday, January 16, 2012

Clay fever

Somehow I manged to pick up a new crafting hobby. Actually according to my mother it's just a rekindling of an old hobby. When I was about 4 my mom had gotten tons of tools and such because I wanted to sculpt with clay. However she had to take it away when I threw a fit because the pieces weren't coming out quite as perfect as I wanted. Apparently I would not hear that at 4 I didn't have the fine motor skills to make the detailed designs I had seen. Well several years later I still faintly remember wanting to sculpt and now I have!
After a night trip out to walmart I came back with a $10 set of colored clay and $6 in grey normal clay. The colored clay has one oz pieces of 10 different colors and 2oz pieces of white and black.

All the clay is to be baked in the oven at 275 deg F for 15 min. I found out that my oven runs a bit low so I had to set it slightly past 275 deg F but not at 300 deg F.

Since I had significantly more grey clay I started with this since I remember having so many issues creating things I thought this is a good way to practice. I started by finding a tutorial for a rose and made a rose. Then another rose then a bow.

To make the bow I made tiny balls then flattened them with my finger and attached them to the rose for the petals, shaping as i go.

Next since that turned out so well I wanted to make a little Chibi girl.
This involved two balls one large than the other. The larger one for the head, slightly smaller one for the body. Then making a snake to cut the pieces of hair from. I also added a headband and a little bow for the hair. Next I cut little slits in the bottom of the body to simulate a pleated skirt.


After this I had enough courage to try with the colored clay. I decided to mix the colored clay with the grey to get slightly softer colors as well as stretch the colored clay further.


The first thing I tried was another chibi girl with curly hair and a rose on her headband. 


After her came another chibi girl with straight hair and a larger bow. I made her to resemble the lolita outfit I wore to a convention.


Then I decided to go very intricate and make a tiny tardis. I decided to make this into a necklace by butting an eye pin into it. I got quite a few of the eye pins from walmart for $2.


While I was waiting for the tardis to come out of the oven I decided I wanted to paint the grey clay pieces. All I had close by was a bunch of dollar store nail polish. So first I painted the roses red and blue, then the bows black and blue. And the little chibi girl blue for the body and headband and bow. The white nail polish over the top of the body as a shirt and the bow. Also used the white on the face. Then used the black for the hair and eyes and red for the lips.
The penny is in the middle for size comparison.
I think next I will make a necklace set as well as items to possibly try my hand at a decoden like box.

Saturday, January 7, 2012

JSK -no pattern needed!

I decided I wanted to make a jumper skirt (JSK in the lolita world) I found this pinstripe cotton fabric at walmart for $1.50 per yard. So I got 5 yards of it. The fabric is inexpensive because it seems to want to unravel quite easily although it has a nice texture.

I decided I wanted to make it fit around the waist using shirring. Shirring is elastic sewn into the fabric to make it punch up a bit.


First I cut out a length for the top. then the same length but half the width for the insert in the top(facing). I did this to have clean lines for the neckline.
Then I took the measurement of the length and multiplied it by about 2 and pleated more fabric to make the skirt.


I made two straps and sewed a bit of lace to each side of the straps. I secured the straps to the top of the shirt by sewing them between the top and the facing for the top.  


I also top-stitched the top and added lace between the straps.


Next I decided I wanted to add an underskirt. So I cut out a rectangle the width of the top and decided to add box pleats at the bottom of it to form the under skirt. I saw a neat tool online called a quick pleater. Since I'm poor I can't buy it so I tried to make one out of cardboard. It worked for the duration of the project and promptly fell apart after.


I sewed both skirts together with a basting stitch then sewed it to the top. The next time I do this. I won't sew the skirt to the top till I am totally done.

After sewing the bottom to the top. I used elastic thread to sew strips across the top from right under the chest to right above the hip.


After sewing in all of the elastic I sewed both sides of the dress together. Next time I will sew each skirt together then sew it to the other parts. I then got help measuring where the straps should be places. Sewed the other end of the straps into the dress.


Finally I wanted a scallop pattern at the bottom so I gathered a bit of the fabric of the top skirt in 6 places and hand sewed each of them into place. I then made bows out of the same fabric to attach at each of these 6 gathers. 


I'm thinking about adding a (removable) black sash to it and wearing it with a black blouse so it can coordinate with my black shoes.

lolita without brand names?

So lately I've been very interested in Lolita fashion. However on my poor budget there is no way I can afford to buy name brand items, who needs name brand anyway? Some of the dresses can cost over $300 for just one dress! I've made quite a few items lately so I need to catch up on my posts. This will be about two different skirts I tried.

The first skirt I attempted is a simple black circle skirt with a ruffle at the bottom.
Not many pictures since I just used the calculated radius to cut out a waist and the rest of the skirt. I also decided against adding the lace lying in the picture after consulting a lolita fashion forum. 


The next skirt I made is more of an alteration. I found a fun ankle length swishy skirt at the thrift store.

I cut off the waste band at about 4 inches. I had to also cut around the zipper.


I then sewed darts into the waistband so it would fit snug around my entire waist, in the hope of creating a high waist skirt.


Next I pleated the remainder of the skirt and sewed it to the bottom of the waistband so that the length of the skirt was about knee length.

Halloween.... a bit late

Time has just gotten away from me. I meant to post this sometime back in 2011 :)
The boulder outfit had 4 different elements: pants, wrist/ankle bands, belt and hair

1. Pants

To make these I just used the same technique as all of my Kung Fu pants only shorter. 
First, I fold the fabric into 4 such that i have a double fold on one side, then cut a semi circle for the crotch and down at an angle to the bottom. Next I sew the two halves together at the crotch then sew one seem to form both legs. After adding a bit of elastic I have baggy shorts.


After forming the pants I added some yellow ribbon to the ends of the leg holes to emulate a cuff. I added some extra fabric to the bottom so I didn't have to sew onto the elastic portion. I wanted to be able to snap it so it would be tight but this didn't quite work out so I ended up just having it sewed partly around. 


2. Ankle and wrist bands


In order to make both bands I formed a tube with the same fabric as the pants and sewed velcro to the ends to make it easy to attach.
This was much more difficult then I expected and took me several tries to get it right. I realized that I needed to use a continuous strip of velcro otherwise it would pucker at the place the velcro broke.

Also it took a while to get the size of the tubes right since the arms and legs do not increase in in diameter linearly.


3.Belt

For the belt I needed to stabilize it, so I sewed the lighter green fabric to a fake leather fabric that I had found a remnant of in walmart. This is the same fabric I used to make the water bag for my katara costume a while back.

I then cut out the 'loin cloth' strips from the brown fabric and hemmed them.


Next I cut out a wide piece of darker green fabric and gathered it to match the width to the belt. I then took the front brown strip and sewed it to the gathered portion of the belt.
I then attached the green gathered portion to the rest of the belt


After attaching the front brown section, I measured to make sure the cloths would lie evenly and sewed on the back section.


Next I added snaps to the wrong side of the stiff belt and right side of gathered portion so the belt could be held in place.


Next I needed to add the details to the belt. I used puffy fabric paint in yellow to get the relief I wanted on the belt. I used paper as a straight edge to get the edges painted.


Then used the paper with circles cut out to make the 'jewels' on the belt.

I let it dry for about 24 hours before removing the paper for each part. The other bits of the belt are rolled up and pinned to the underside of the belt so they didn't get paint on them.


4. Hair 


In order to make the top bun for the hair I used the same ribbon from the bottom of the pants and sewed it onto a strip of fabric.


 I the used hot glue to attach some foam to the top of a cardboard piece. Then wrapped bits of hair around it to form a bun.


I hot glued another piece of cardboard around the first to secure the hair and added strips of fabric to the bottom in order to be able to secure it to the hair.


Next I glued the fabric around the last layer of cardboard.


So this was the last sewing element.


The day of the Halloween party I drew the design on his back using silver eye liner to outline the pattern and non-toxic grey marker to color it in. I also used black eye liner to draw in facial hair that was missing like the side burns.